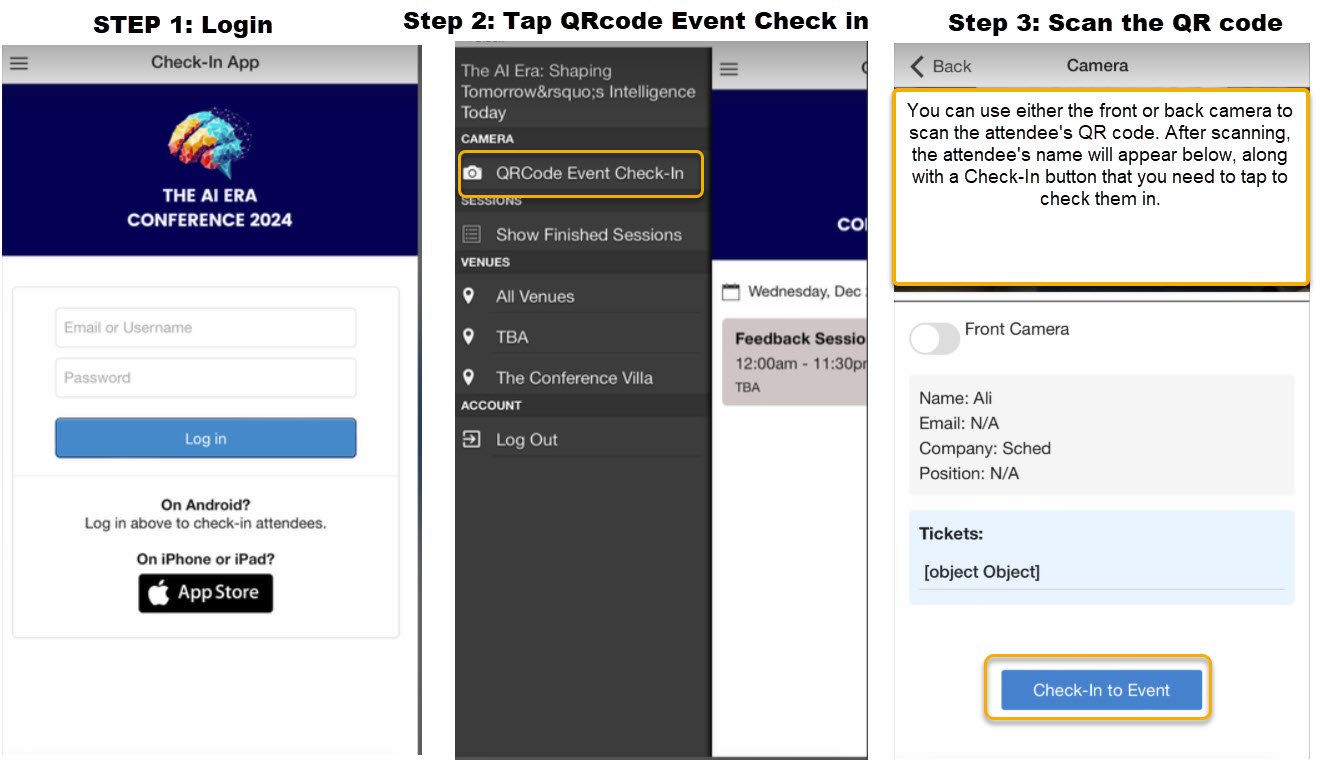
This feature allows event planners and check-in managers to check in attendees by scanning their QR codes using phone cameras or QR code scanning apps for both overall event check-in and per-session check-in.
How to Log In as a Check-In Manager or Admin to Check In Attendees #
To check in attendees using QR codes, follow these steps:
- For Admin Go to the Event Page – You can find the login link needed for check-in under the Schedule tab:
-
-
- Go to Schedule > Check-In.
- Click the bookmark icon to access the check-in page or copy the URL to share with the Check-In Manager.
- Once you click the bookmark icon in the Android app, copy the link and paste it into your mobile web browser to log in. You can also use this link: https://youreventURLname.sched.com/checkin
-
-
Note: You must be logged in to your mobile browser before scanning QR codes to ensure the check-in button appears automatically.
How to Check In Attendees for Overall Event Check-In #
- Once logged in to the URL shared by the admin, or as an admin, copy the link from the Bookmark icon in the Android app under your control panel.
- Click QR Code Event Check-In to check in attendees for the overall event.
- You will have the option to use your front or rear camera to scan the QR code. Once scanned, a Check-In to Event button will appear on the screen—tap it to check in the attendee.
How to Check In for a Session #
There are two options for session check-in:
1. By Check-In Managers Check In Attendees
Check-In Managers can check in attendees using the following methods:
- Manually: Select the attendee’s name from the list and toggle them on for check-in. In both the app and web versions, a Check-In Manager can manually check in attendees by selecting their names from the list and toggling them on for check-in. You can also add attendees who are not yet part of the session and check them in. For both the web and Sched Count app, when adding an attendee manually, you should use the email address they are currently registered with in the event. This ensures their profile automatically appears after adding them.
Screenshots when using the mobile or a regular web browser:
Screenshots when using the Sched count app. Please note that the use of QR codes in the Sched mobile app is not available at this time, except when using the Eventbrite integration.
- A Check-In Manager can scan the attendee’s profile QR code to check them in.
2. Attendees Can Self Check-In
- Scanning the Session QR Code: Attendees can scan the session QR code using their mobile device to check in.
Note: Attendees have two options for scanning the QR code:
- Once logged in, they can tap the QR code icon to scan.
- They can use their phone camera to scan the QR code directly.
However, they must ensure they are logged in on their mobile browser before scanning with their phone camera.
- Manually Checking In: Attendees can open the session in Sched and click the “Check-In” button. Attendees can manually self-check in both on the web and in the Sched app.
How to allow attendees to check-in via QR Code #
-
Go to your event’s Control Panel
-
Under Settings > General
-
Toggle on the ‘Allow QR Code Check-In‘ button under the Attendance section
-
Click on the Save button.
Print session QR Codes and download Check-in data #
-
-
Go to your event’s Control Panel.
-
In the “Sessions” section, select the session you want to print the QR Code.
-
Under the ‘Check-In‘ tab, click on the QR Code icon to print or export icon to download Check-in data.
-
View attendee check-in #

Related Article: Attendee Guide on QR Codes


