- Registration & Event Privacy Settings
- How Does Sched Registration Work?
- How to Set Up and Customize the Registration Form
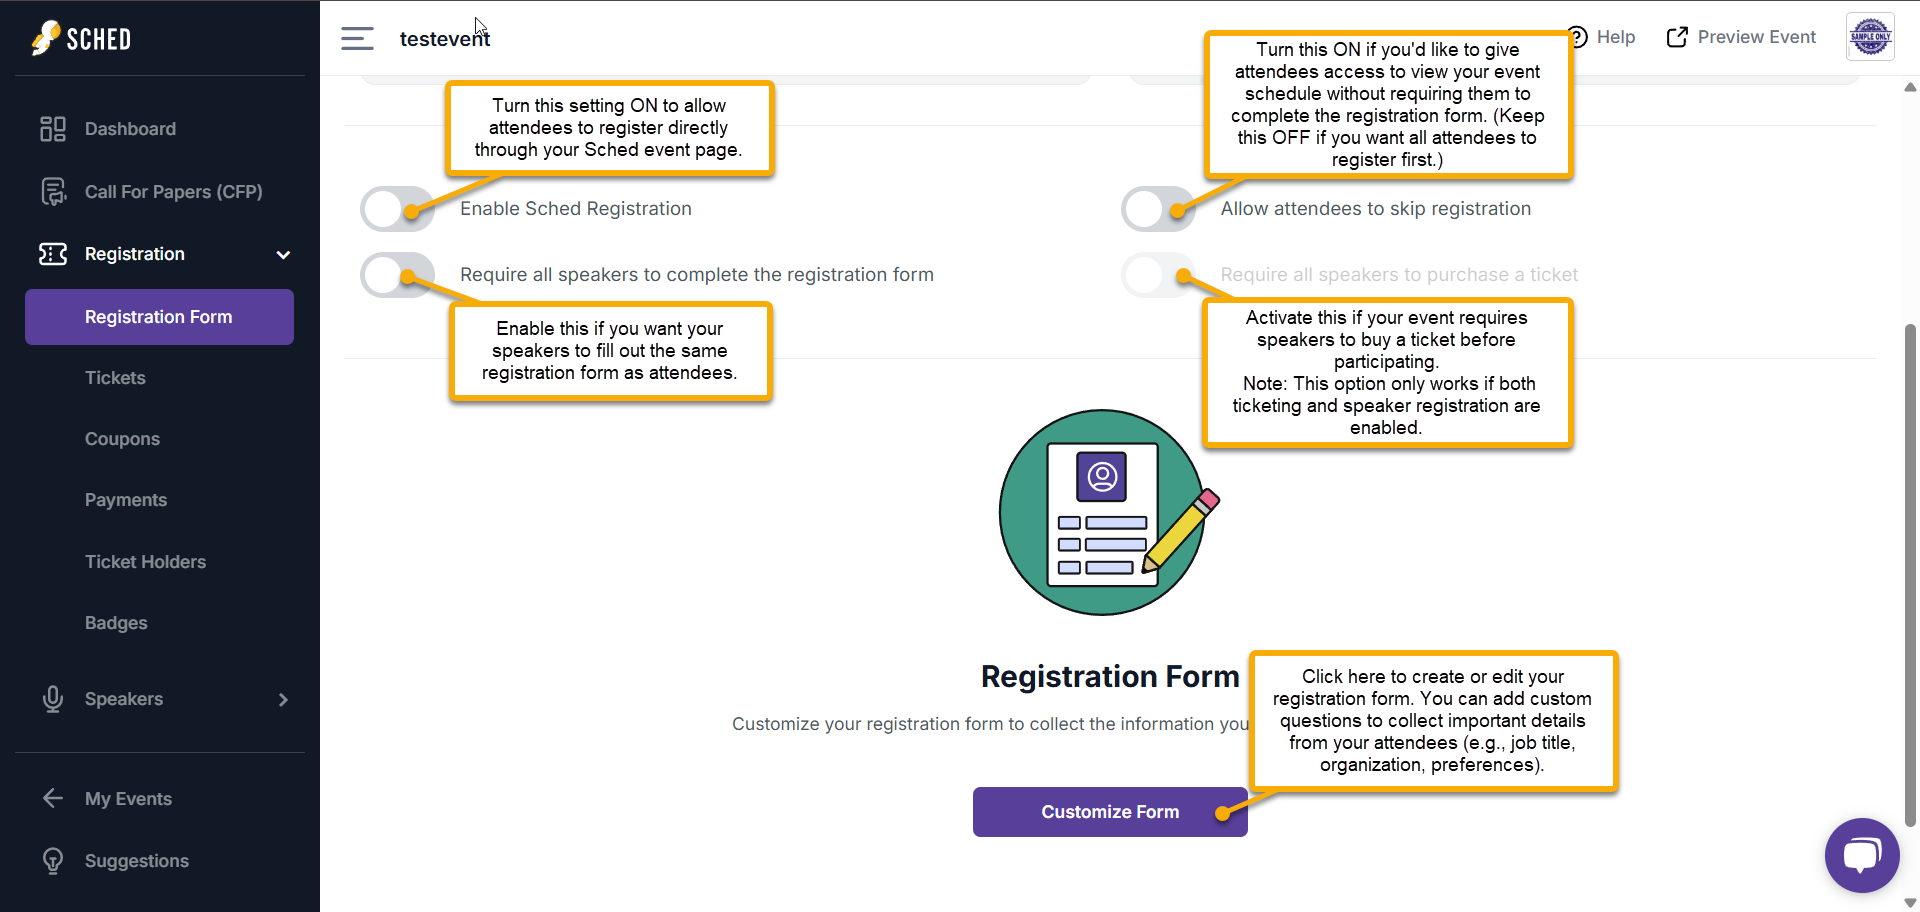
- Enable Registration
- Require Speaker Registration
- Choose Whether to Allow Skipping Registration
- Require Ticket Purchase for Speakers
- Customize Your Registration Form
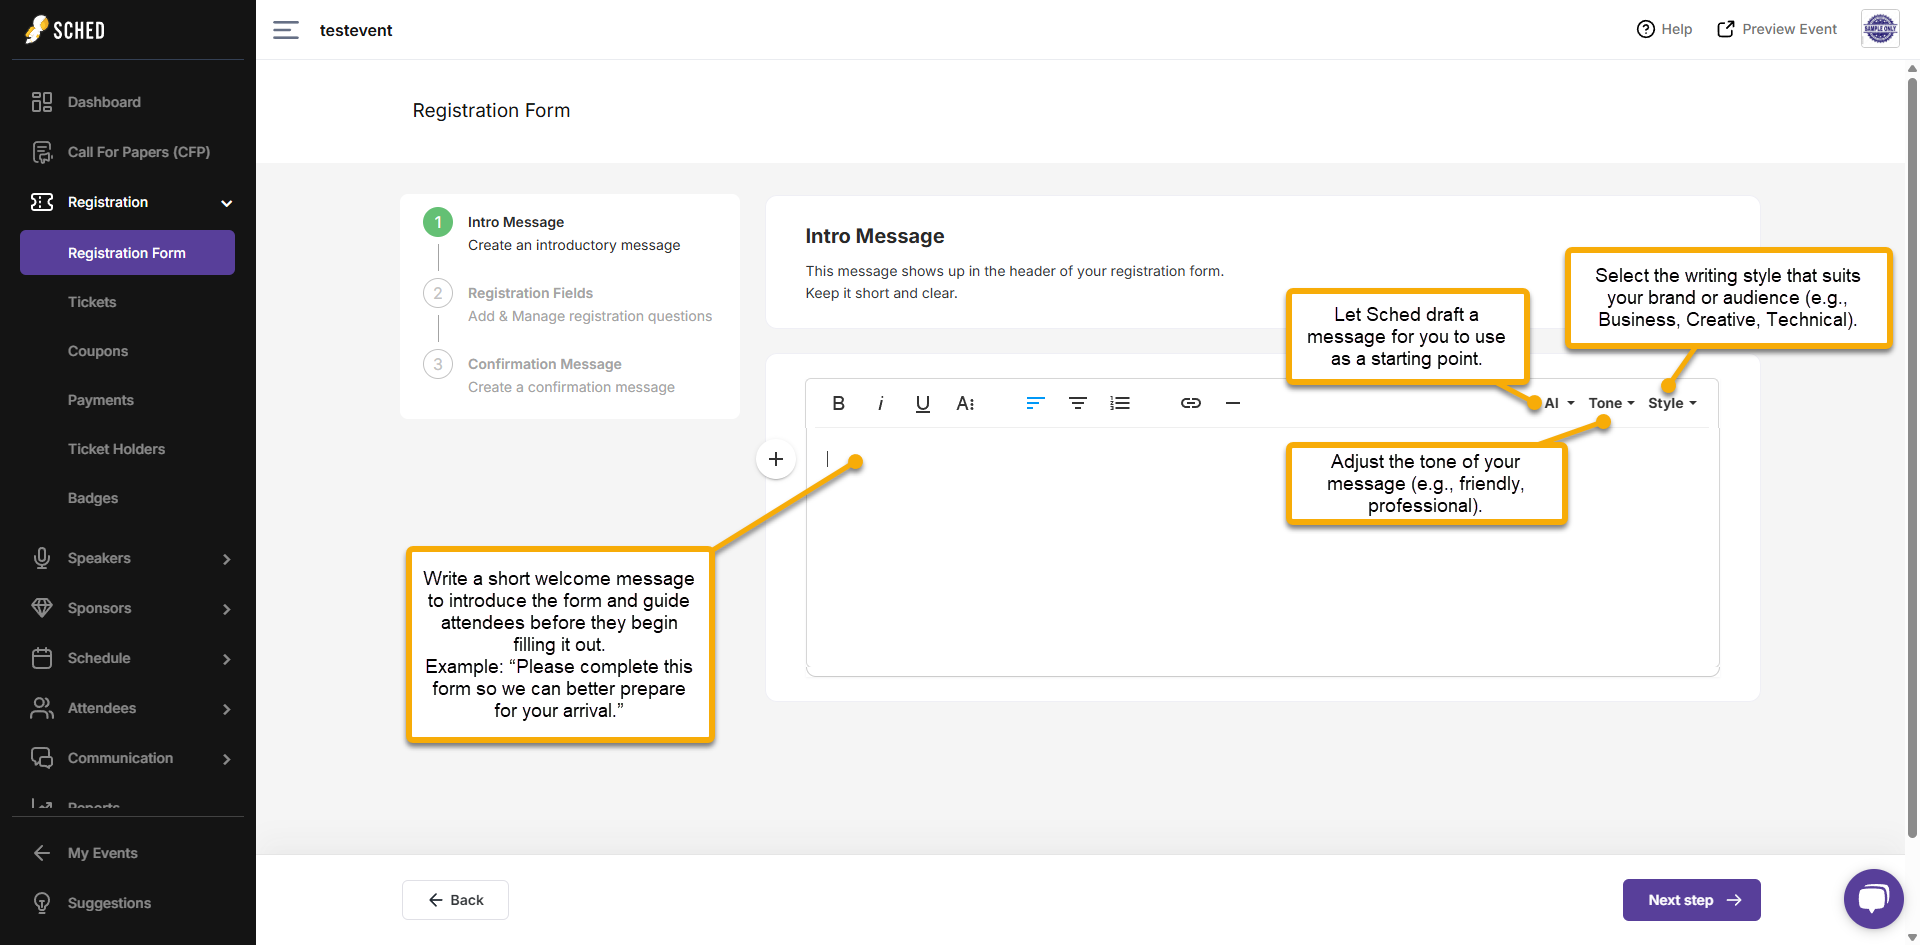
- Add an Intro Message
- Add Registration Fields
- Creating Registration Form Questions
- Question Types
- Confirmation Message
- Final Steps
- Reporting
- Things To Keep In Mind
- Adding a Ticket
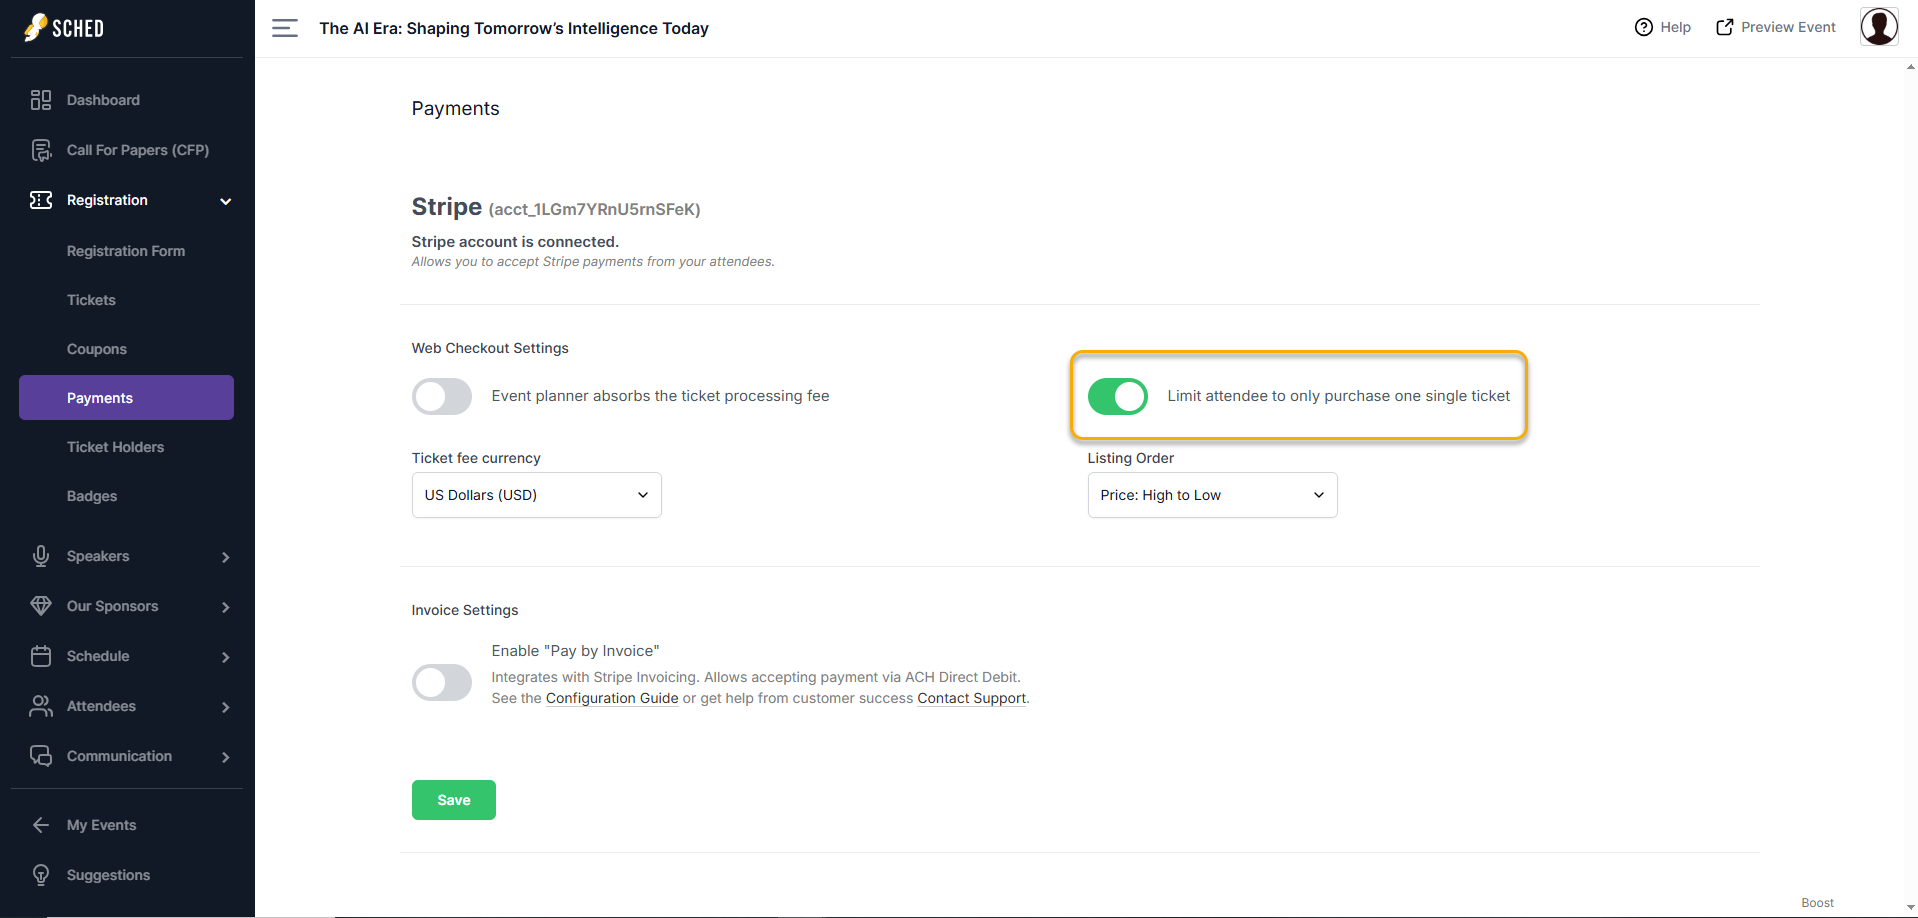
- Limit Attendee To Purchase One Ticket
This is a guide for using Sched to collect registrations/sign-ups for your event.
Registration & Event Privacy Settings #
Set the privacy of your event to allow attendees to register for your event directly on Sched:
- Go to Settings > General in your event Control Panel
- Select Edit in the Privacy section
- Select Public event with open signup
- Click Save
How Does Sched Registration Work? #
If an attendee has signed in but has not registered for an event, a registration pop-up will appear for any events with registration turned on. This feature applies to events that offer ticket sales, whether the tickets are free or require payment. Additionally, the registration form can still be used even if the event does not have tickets. This allows event planners to ensure that all attendees complete the event’s registration form.
How to Set Up and Customize the Registration Form #
Use this guide to configure how attendees and speakers register for your event in Sched. You’ll be able to control access, customize forms, and manage ticketing requirements.
Enable Registration #
In your event’s Control Panel
- Click the Registration tab
- Then, the Enable Sched Registration button.
Require Speaker Registration #
Enable the speaker registration requirement if you’d like your speakers to complete the same registration form as attendees. This ensures you collect consistent data from everyone participating in your event.
Choose Whether to Allow Skipping Registration #
Decide if you want attendees to view the event schedule without registering. Enable this option if you want to offer open access. Keep it disabled if you’d prefer everyone to register before gaining access to the schedule.
Require Ticket Purchase for Speakers #
If your event setup includes ticketing and speakers must purchase a ticket before participating, turn this option on. This ensures that your event’s financial requirements apply equally to all attendees and speakers.
Note: Ticketing and speaker registration must both be enabled for this setting to work.
Customize Your Registration Form #
Create or edit your registration form to gather key information from attendees. You can add fields for job titles, organizations, or any custom questions relevant to your event. This helps personalize the experience and collect valuable insights.
#
Add an Intro Message #
At the top of your registration form, you can include a brief welcome message to greet attendees and provide context before they begin filling it out. This helps set the tone and clarify the purpose of the form.
Example:
“Please complete this form so we can better prepare for your arrival.”
Optional Tools Inside the Text Box:
- AI: Let Sched draft a message for you to use as a starting point.
- TONE: Adjust the tone of your message (e.g., friendly, professional).
- STYLE: Select the writing style that suits your brand or audience (e.g., Business, Creative, Technical).
Add Registration Fields #
Sched automatically includes the following required questions:
- First Name
- Last Name
- Email Address
These cannot be modified or removed.
To Add Your Questions:
- Click + Add Form Question button
Creating Registration Form Questions #
Build your form by adding questions to collect important attendee details. Each question can be customized based on what information you need and how you want it answered.
Adding a Question
When creating a new question:
-
Question Field – Write what you want to ask.
Example: “What’s your job title?” -
Description (optional) – Add extra context to help attendees understand why you’re asking.
Example: “This will appear on your badge.” -
Question Type – Choose the response format (see types below).
-
Required Toggle – Make a question mandatory if it must be answered before submitting the form.
-
Options Menu (⋯) – Duplicate or delete the question as needed.
Navigation Tips: At the bottom of the form page, use:
-
Back – Return to the Intro Message section.
-
Next Step – Move forward to the Confirmation Message section.
#
Question Types #
Choose a format that fits the kind of information you’re collecting
-
Text – Short, open-ended answers.
Best for fields like “Company Name” or “Job Title” -
Multiple Choice – One answer from multiple options.
Supports conditional logic for follow-up questions.
Example:
Main Question: Are you of legal age?
→ If Yes: No follow-up needed
→ If No: Ask for the parent/guardian’s name and email
-
Check Boxes – Multiple selections allowed.
Each option can also trigger follow-up questions. -
Dropdown (Single Select) – One answer from a dropdown list.
Does not support follow-up questions. -
Dropdown (Multi-Select) – Multiple answers from a dropdown list.
Supports conditional logic. -
Upload – Attendees can upload a file (e.g., resume, signed waiver).
Max file size: 10MB -
Email – Used to collect an additional email address, such as an emergency contact.
Note: This will not replace the attendee’s login email.
Confirmation Message #
After someone submits their registration form, they’ll see a confirmation message. Use this space to thank them, confirm their submission, or provide next steps, like event check-in instructions or contact details.
You can also use built-in AI, tone, and style tools to help craft the perfect message.
Example:
“Thanks for registering! You’ll receive a confirmation email shortly. Be sure to check your inbox for event updates.”
#
Final Steps #
At the bottom of the confirmation message page:
- Back – Return to the registration questions to make changes.
- Done – Save and publish your complete registration form.
Once you click Done, your form will go live and be ready to accept registrations.
Reporting #
Access the registration form data for an individual attendee:
- Go to the Attendees section in your event Control Panel
- Find the Attendee
- Click on their Name
- Go to the Registration tab
Access the registration form data for all attendees:
- Go to your Reports tab.
- Under the Attendee section, look for Attendee Registration Response.
- Click to download the Registration file.
Things To Keep In Mind #
- The First Name, Last Name and Email fields on the Attendee Registration Form are mandatory. It is not possible to remove these.
- Information provided on the Attendee Registration Form is viewable to Admins only. It will not display on Attendee Profiles.
Adding a Ticket #
Attendees can add unlimited sessions of any kind if no tickets are created and no ticket rules are set up. If you have groups or segments of attendees that have access to days or activity types, set up tickets and create ticket rules to limit what attendees can add to their personal schedules.
To add your event tickets:
1. Go to Control Panel > Registration
2. Toggle on the ‘Enable Registration‘ button under the Registration Form tab
3. Click Tickets and choose Sched (as your ticketing platform) then click on the “+” button to add your first ticket
4. Click ” add ticket“
Please note that purchasing multiple tickets of the same type does not allow your attendees to attend different sessions. Instead, it reserves the same number of slots for a single session. Please ensure your attendees are aware of this to avoid overbooking and the need for ticket refunds.
ie.,
An attendee bought 3 tickets, entitling them to 3 slots for one session.
Limit Attendee To Purchase One Ticket #
This feature allows you to limit each attendee to purchasing only one ticket for your event. Please note that while this feature is active, transferring tickets to other attendees will be disabled.
Need to transfer an attendee ticket? Reach out to us at support@sched.com for further assistance.
Customize Your Ticket #
Once you have set your ticket types, you can now customize each ticket.
1. Click on the added ticket that you’d like to customize.
2. Ticket Name and Description – Enter your preferred ticket name and add your ticket description.
3. Ticket Key – If you want to assign a specific ticket to an attendee using the attendee spreadsheet, you can use a unique ticket key per ticket, which you can later input in the ‘Ticket’ column in your attendee spreadsheet.
4. Start/Stop Sales – Set the start and end date for the ticket selling.
5. Quantity – Set the number of tickets that you want to sell.
Note: If you don’t set a number of tickets available, that will automatically default to an unlimited quantity for sale.
6. Price – You can set the price for the ticket, but when the field is blank, it means your ticket is for FREE.
Important: You must connect to your Stripe account before you can set the ticket prices and start selling them!
7. Click on the ‘Save Ticket’ button.
Note: The video shows one ticket type that was set to unlimited and free, and one ticket type that is paid and has limited slots. It also shows how the ticket type will appear on the attendee’s end.
Ticket Warnings #
Ticket warnings are shown when an attendee doesn’t have permission to add a session due to ticket rules. You may customize your own ticket warnings or use the default warnings we have in this feature.
Set Your Ticket Wanings:
1. Go to Control Panel > Registration
2. Click Tickets > “…” button on the upper right part
3. Customize Ticket warning
4. Click Save
Types Of Ticket Warnings #
Two possible messages show up, depending on whether they hit the set ticket limit or don’t have a ticket at all.
1. Ticket Warning: Count Exceeded
If an attendee has used up their session allotment.
Sample pop-up message:
You’ve reached the limit for this activity type.
Please unschedule an existing activity if you’d like to add this one.
2. Ticket Warning: No Ticket
If an attendee doesn’t have the correct ticket.
Sample pop-up message:
Adding this requires a ticket.
Contact the event organizer for ticket details
and try adding this again after you obtain one.
Set Up Ticket Rules #
By default, attendees can add unlimited sessions unless ticket rules are applied. Ticket rules let you control which sessions ticket holders can access—by day, session type, number of sessions, or even session limits on specific days. If you apply rules to one ticket type, it’s recommended that rules be added for all ticket types.
You can apply multiple rules to a single ticket.
Example Scenario:
The event planner wants General Admission ticket holders to select only 2 sessions total across March 24, 2025, limited to sessions under the Keynote and Workshop types.
Watch this video to see where to set these rules and how to configure this scenario.
Ticket Holder/Ticket Sold Section #
To view the list of ticket holders per ticket, you may go to the Ticket Holder section under the Registration tab. And in the same section, you can also view the total number of tickets sold per ticket.
Please note that manually adding tickets to your participants may cause discrepancies in the ticket count.
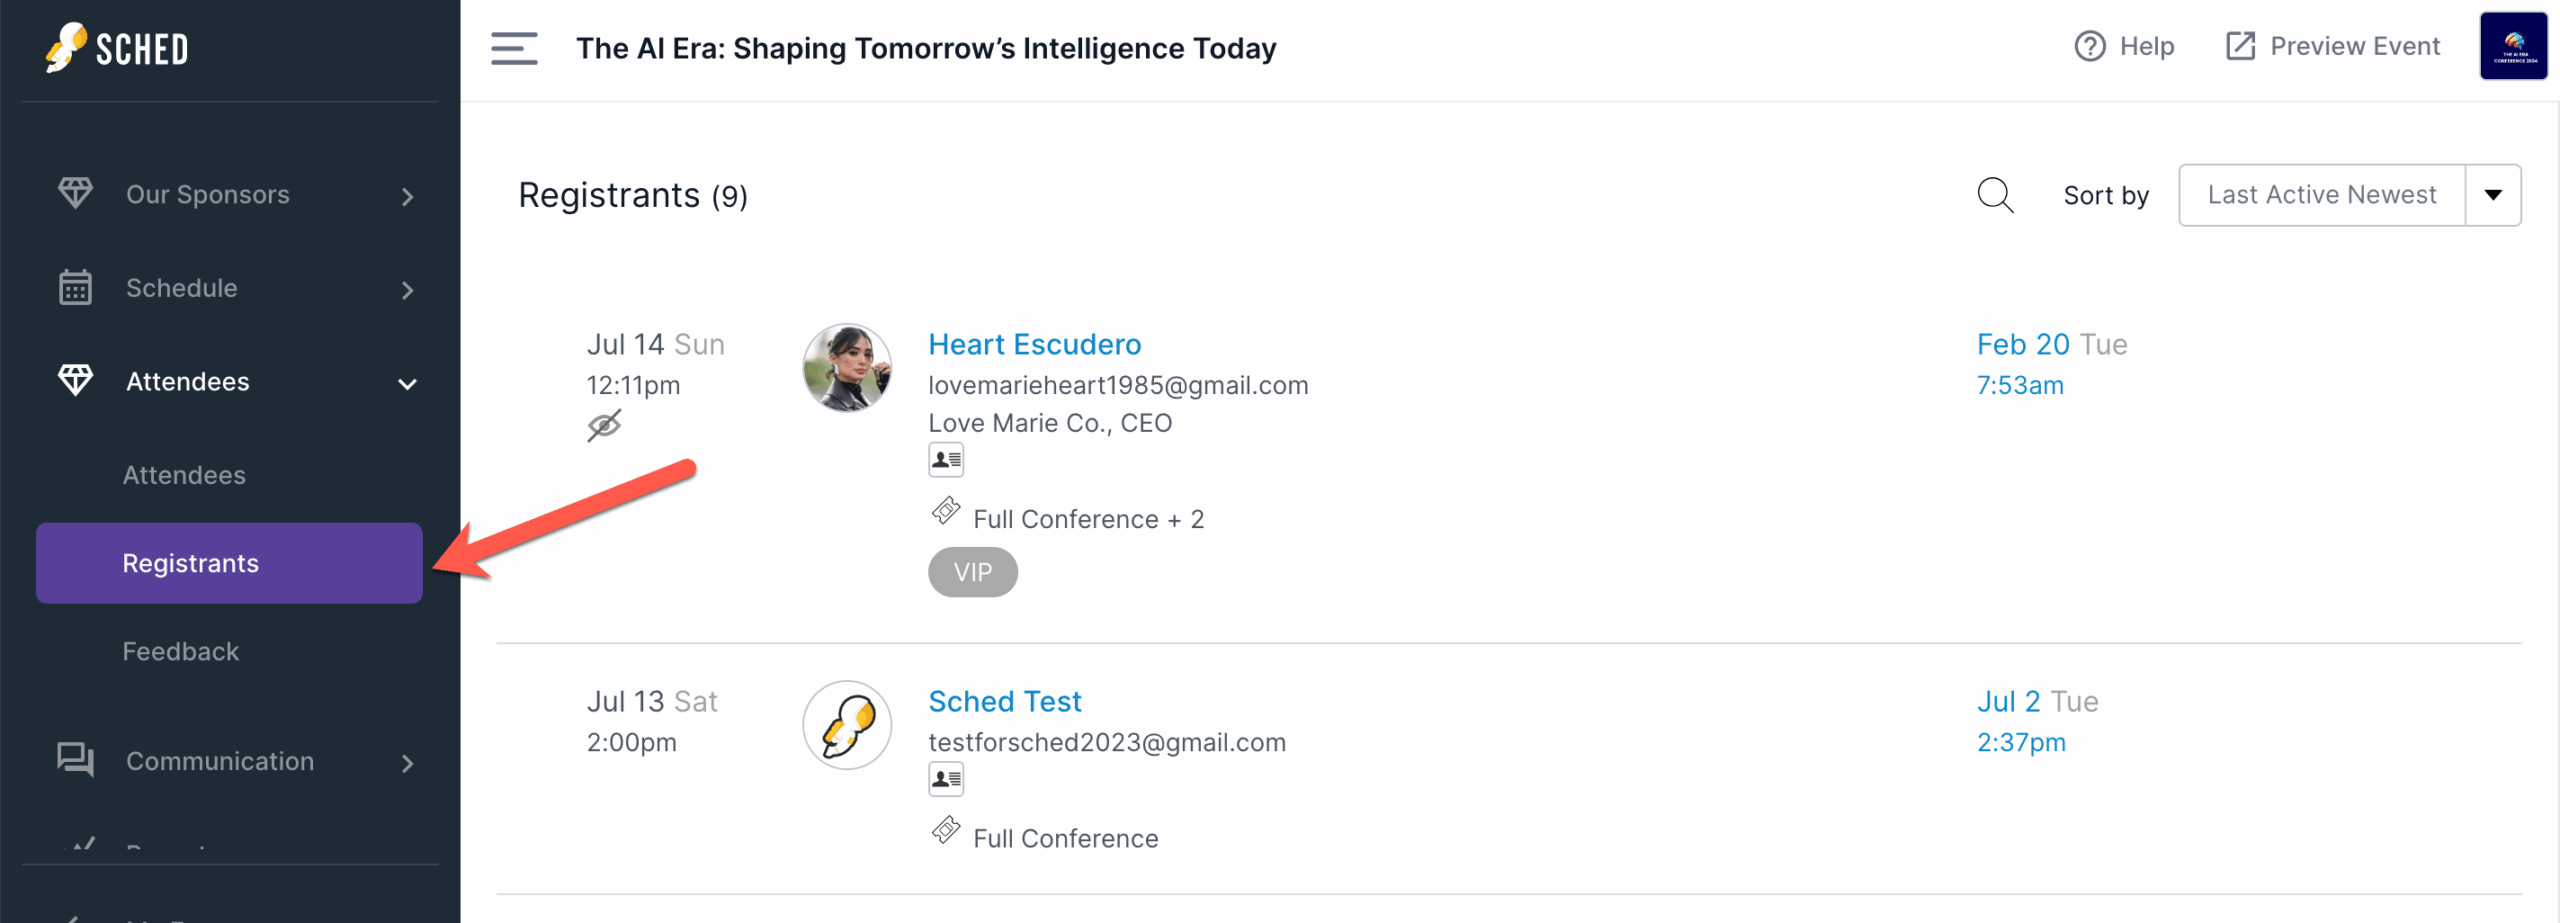
View who completed the registration #
Below are the two ways to view the list of participants who registered for your event. The list also includes the date and time they completed and submitted the registration form. Through the ‘Registration Form’ section:
1. Go to your event’s Control Panel
2. Under Registration, click on Registration Form
Through the Registrants section:
1. Go to your event’s Control Panel
2. Under Attendees, click on Registrants
Sched Setup
- Go to the Registration tab in your event’s Control Panel
- In the Payments tab, click on Connect with Stripe (Note: If you see a ‘Please enable Ticket API to continue’ message, contact our Support Team to have this enabled.)
- Log in to your Stripe Account
- In Sched, confirm you have a “Stripe account is connected” message displayed once successfully connected.
- Toggle on/off Sched Service Fee to have this added to the ticket price and charged to attendees, OR absorbed within the ticket price and deducted from your ticket revenue
- Select your preferred Ticket Currency using the drop-down
Managing Payments #
Your Stripe account can manage most of the common tasks related to collecting payments, including payouts, declined payments, receipts, and refunds.
Check out this Stripe setup guide to begin collecting payments for your event.
Adding a Coupon Code #
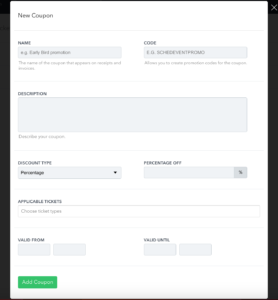
- On your events page, you can include coupons that attendees can use. These coupons can be either a percentage discount (e.g., 50% off) or a specific amount discount (e.g., $50 off). Share the codes with your attendees so they can apply the discount when they make a purchase.
- You can create coupons immediately after electing to use Sched ticketing, regardless of tickets created or stripe connection status.
- You can add a Coupon Code that can be applied to any ticket type or a coupon code for a specific ticket.
Steps to use it in your event:
1. Go to Control Panel > Registration > Coupons
2. Click on the ‘+‘ button to add new coupons
3. After filling out the fields, click the ‘Add Coupon’ button
Adding a Secret Ticket Coupon Code #
This will enable you to show special ticket options to only those who have the unlock or coupon code for the ticket.
How to hide a specific ticket type
1. Go to your event’s Control Panel > Registration
2. On the Tickets section, hover your mouse over the ticket you’d like to hide
3. When you hover over the ticket, you will see an option to Edit. Click on the arrow pointing downwards ▼ to access a dropdown menu
4. From the menu, select the option Hide Ticket.
The hidden tickets will be visible in the checkout interface only when an attendee enters the secret coupon code to unlock them.
How to add a secret coupon code
1. Go to your event’s Control Panel > Registration
2. Under the Coupons section, click on the ‘+‘ icon to add a coupon
3. In the Coupon Type, select Reveal Hidden Ticket option from the dropdown menu
4. Fill out the fields, and when done, click on the Add Coupon button
Domain Whitelisting #
Restrict sign-up and login to your event to those with specified email domains (eg. @yourorganization.com).
Attendee Experience #
Where attendees can register:
- Your Sched Event Website – eg. yourevent.sched.com/signup
- Your Own Website – if you are using the website embed option
- Either the Sched Mobile Apps or your Branded/Native Mobile Apps (if purchased)
How attendees can register:
- An Email address
- An existing Sched account
- Their Google account
- Their Facebook account
- Or through the Microsoft SSO option
The steps attendees will go through to register:
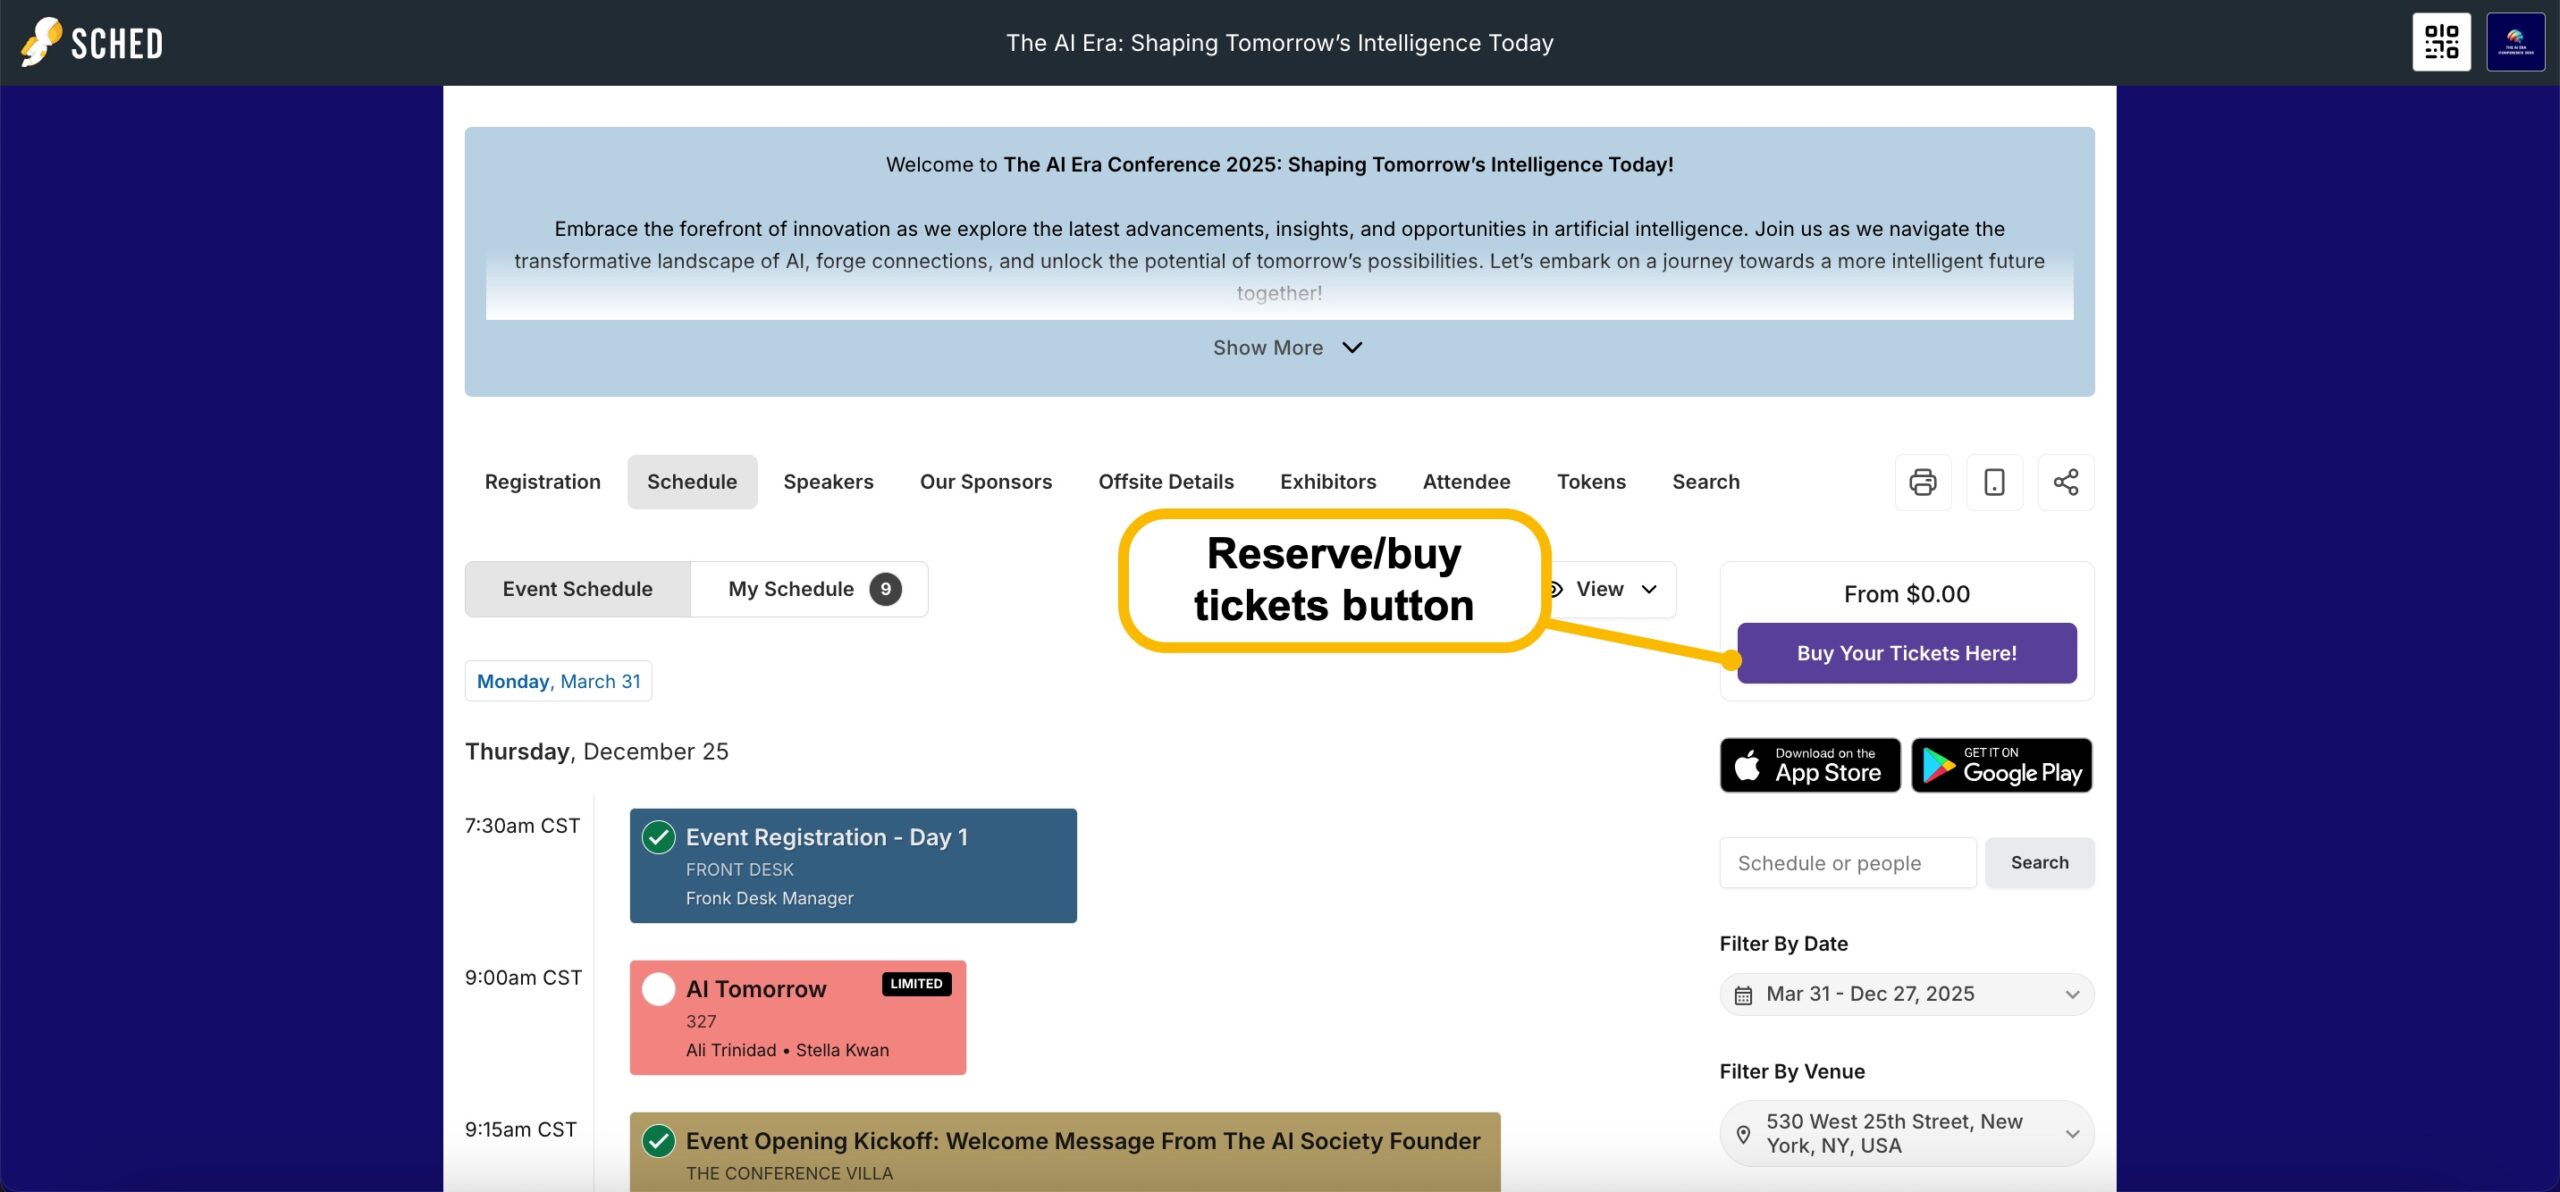
1. After creating their Sched profile or signing into their existing Sched account, they will be routed to the events page where they can purchase a ticket:
2. When they are ready to purchase, they can click the Reserve Tickets button, which will take them to the ticketing and registration interface. Once done, they can then select sessions for their schedule.
Here’s how an attendee can purchase, register for an event, and share their ticket:
